 Save
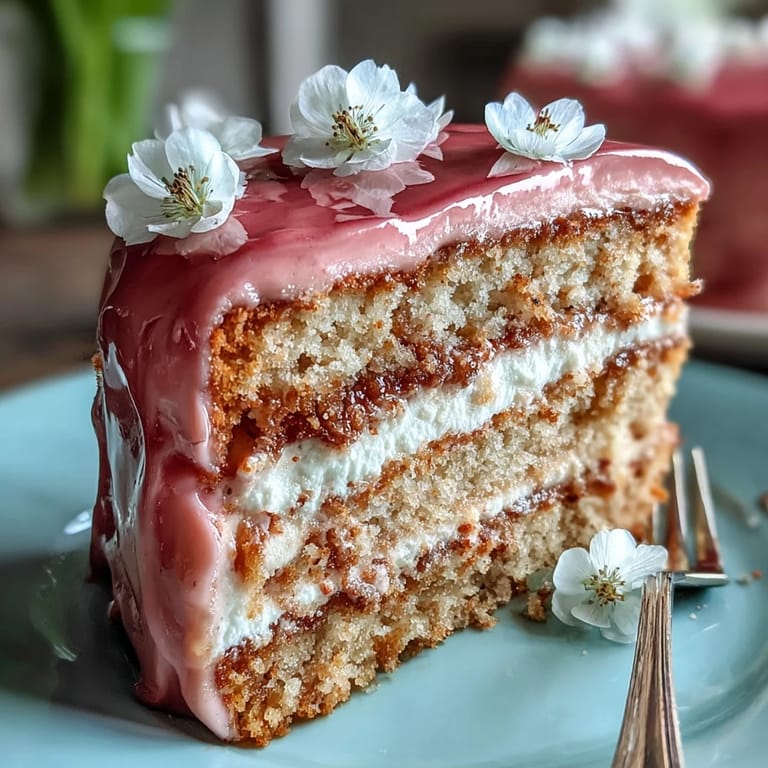
Save My sister called me three weeks before Mother's Day in a panic—she'd volunteered to bring dessert to our family lunch but realized she couldn't bake to save her life. So I found myself in my kitchen on a quiet Tuesday morning, experimenting with layer cakes and ombre techniques, determined to create something that would make our mum feel as special as she deserved. What started as a favor became an obsession with getting that gradient of pink just right, watching the buttercream transform from white to the palest blush to a bolder rose with each careful addition of gel coloring.
When I finally brought that first ombre cake to our Mother's Day table, my mum actually gasped—not because it was perfect, but because she could see the love baked into every layer. My sister squeezed my arm, and suddenly it didn't matter that I'd spent hours getting the shades right or that I'd nearly overdone the buttercream once. That cake became the centerpiece of the meal, and every single person came back for seconds, asking if this was the kind of thing I made all the time.
Ingredients
- All-purpose flour: Use a fresh bag and spoon it gently into your measuring cup—scooping directly compacts it and throws off your ratios, something I learned the hard way when my first cake turned dense.
- Baking powder: Check the date on your tin; old baking powder is the silent killer of perfectly leveled cakes.
- Unsalted butter: Room temperature is non-negotiable because cold butter won't cream properly and you'll end up with grainy frosting.
- Granulated sugar: This creams with the butter to create lift and air pockets that make the sponge tender and fluffy.
- Large eggs: Also room temperature—they emulsify better and incorporate more smoothly into the batter.
- Pure vanilla extract: Splurge on the real thing; it makes a noticeable difference in the depth of flavor.
- Whole milk: The fat content keeps the cake moist and gives it a subtle richness that skim milk can't deliver.
- Powdered sugar: Always sift it before using to remove lumps that can create a grainy buttercream texture.
- Gel food coloring: It's the secret to vibrant pink without watering down your buttercream like liquid coloring does.
- Edible flowers: Pansies and violets add genuine elegance, and they taste delicate rather than perfumey if you choose the right varieties.
Tired of Takeout? 🥡
Get 10 meals you can make faster than delivery arrives. Seriously.
One email. No spam. Unsubscribe anytime.
Instructions
- Prepare your pans and preheat the oven:
- Set your oven to 350°F and line three 8-inch pans with parchment paper—I grease the bottom first so the parchment sticks and doesn't slip around while you're pouring batter. This takes two minutes but prevents the disaster of a tilted cake layer.
- Mix your dry ingredients together:
- Whisk the flour, baking powder, and salt in a medium bowl to distribute the leavening evenly throughout. This step is boring but crucial because it ensures your cake rises uniformly.
- Cream the butter and sugar until it's pale and fluffy:
- This should take about 3 to 4 minutes on high speed, and you'll notice the mixture transform from dense to cloud-like. Don't rush this—the air you're incorporating now is what makes the cake tender.
- Add eggs one at a time, beating well after each:
- If you dump all four in at once, the batter can look curdled and broken, which stresses you out even though it usually comes back together. Taking it slow ensures a smooth, homogeneous mixture.
- Add the vanilla extract:
- Just a tablespoon, but it's the backbone of the vanilla flavor that ties the whole cake together.
- Alternate flour and milk in three additions:
- Start with flour, then milk, then flour again—this prevents overmixing and keeps the batter tender. Mix on low speed just until you don't see streaks of flour anymore.
- Divide batter evenly between the pans:
- I use an ice cream scoop to distribute it fairly, which takes the guesswork out of whether one layer will be thicker than another. Level the tops gently with the back of a spatula.
- Bake for 25 to 30 minutes until a toothpick comes out clean:
- Check at 25 minutes because oven temperatures vary, and you want the cake baked through but not dry. The cakes should spring back slightly when you press the center gently.
- Cool in the pans for 10 minutes, then turn out onto wire racks:
- This resting period lets the cake set enough to handle without falling apart, but turning it out while still warm prevents the bottom from sweating and becoming dense. Let them cool completely before frosting.
- Beat the butter until creamy:
- This takes a couple of minutes on high speed and creates the base for silky buttercream. You'll notice the color lighten slightly as air incorporates.
- Gradually add sifted powdered sugar on low speed:
- Rushing this step sends a cloud of sugar into your kitchen and can create lumpy frosting. Low speed keeps things controlled.
- Add vanilla and milk, then beat on high for 3 minutes:
- This final beating aerates the buttercream and makes it fluffy enough to spread beautifully without being stiff and hard to work with.
- Divide buttercream and create your ombre shades:
- Leave one bowl white and add gel coloring gradually to the other three—I always add less than I think I need because you can always add more, but you can't remove pink. Mix thoroughly so the color is even.
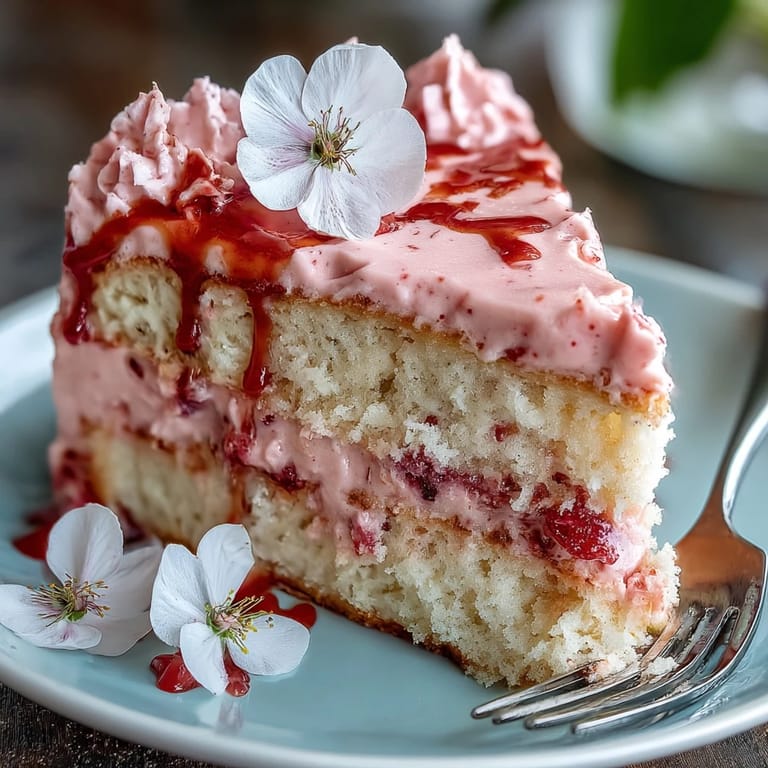
- Layer and frost the cake:
- Place the first layer on your serving plate, spread the darkest pink buttercream on top, add the second layer with medium pink, then the top layer with light pink. Cover the sides with the white buttercream.
- Smooth the frosting with an offset spatula:
- Dip your spatula in warm water and smooth gently—this creates a professional finish without disturbing the crumb. You can also use a bench scraper to blend the ombre up the sides for an even more gradient effect.
- Decorate with edible flowers just before serving:
- This keeps them fresh and vibrant rather than wilting into the buttercream. The flowers add the final touch that makes this cake feel like a celebration.
- Chill for 30 minutes before slicing:
- Cold buttercream holds its shape better, and you'll get clean, beautiful slices instead of smeared frosting.
 Save
Save Months later, my sister texted me a photo from another event where she'd served a version of this cake—and she made it herself. She said watching my hands work through the layers that day had demystified the whole process, made it feel possible. That's when I realized this recipe isn't just about creating something beautiful; it's about permission to try something that looks fancy but is actually within reach.
The Secret to Perfect Ombre
The ombre effect works because you're not trying to create hard lines between colors—they blend naturally where the layers meet. Start with your darkest shade on the first layer, which creates a visual anchor, then lighten progressively as you go up. The white on the sides acts as a neutral backdrop that makes the gradient on top pop, so resist the urge to frost the sides in pink too.
Why This Cake Feels Special
There's something about serving a three-layer cake that signals celebration, even if you made it on a Tuesday in your regular kitchen. The height, the gradient, the flowers—they all add up to something that feels intentional and thoughtful. People respond to cakes like this because they sense the care baked into every layer, and that matters more than whether it's technically perfect.
Make It Your Own
This cake is a canvas, and you can personalize it based on who you're celebrating or what you have on hand. Consider trying different color combinations—a peachy ombre for warm celebrations, a lavender gradient for something softer, or even a blue ombre if the occasion calls for it. The technique stays the same; you're just adjusting the mood with color.
- Brush the cooled cake layers lightly with simple syrup before frosting to add extra moisture and flavor.
- If you can't find edible flowers at your market, crystallized violets or rose petals work beautifully and add a subtle floral taste.
- This cake can be assembled a day ahead and stored in the fridge, which actually makes slicing cleaner and takes pressure off on the day of serving.
 Save
Save This cake has a way of turning an ordinary day into something worth celebrating, which is really what Mother's Day is about anyway. Bake it with intention, and it becomes more than dessert—it becomes a edible love letter.
Recipe FAQ
- → How do I achieve the pink ombre effect?
Divide the buttercream into portions and tint each with increasing amounts of pink coloring, then layer from darkest to lightest on the cake.
- → What kind of flowers can I use for decoration?
Use fresh edible flowers like violets, pansies, or rose petals for a safe and attractive garnish.
- → How to keep the cake moist?
Brushing cooled cake layers with simple syrup before frosting helps retain moisture and adds subtle flavor.
- → Can I prepare the cake in advance?
Yes, chilling the cake after decorating for about 30 minutes helps the layers set and makes slicing cleaner.
- → What tools are essential for assembling this cake?
Basic tools include round pans, an electric mixer, offset spatula, and parchment paper for best results.