 Save
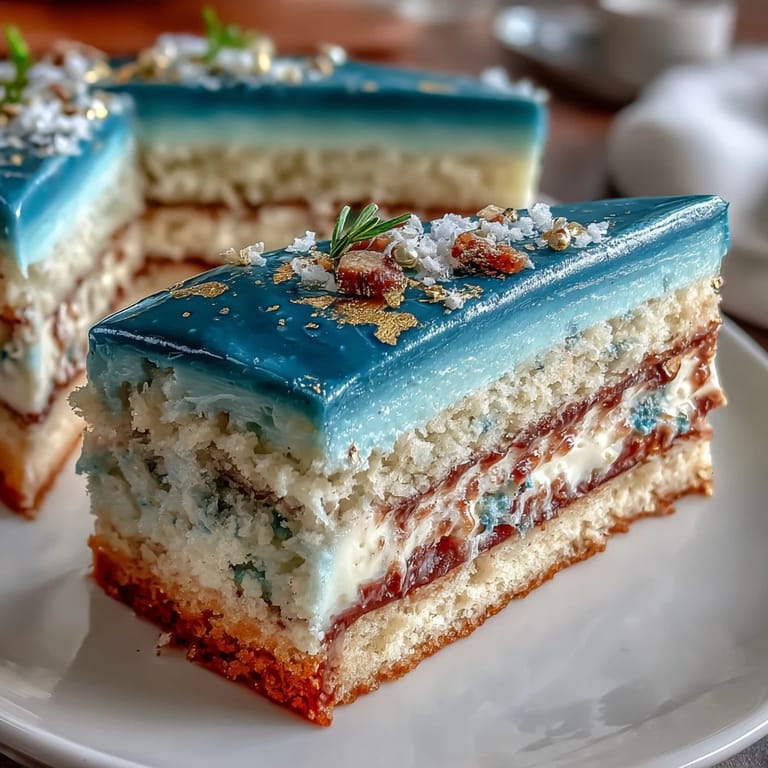
Save The first time I made this graduation cake, my kitchen ended up flecked with blue food coloring and gold shimmer—even the dog sported a golden ear for a day. There& was a thrill in mixing navy and royal blue, watching the batter swirl into something bold and celebratory. Swiping buttercream across the layers felt almost meditative, especially as the gold leaf settled onto the frosting like confetti after a ceremony. I hadn& planned to create something so striking, but the ombre effect emerged beautifully by accident. Decorating this cake almost felt like painting a canvas you could eat.
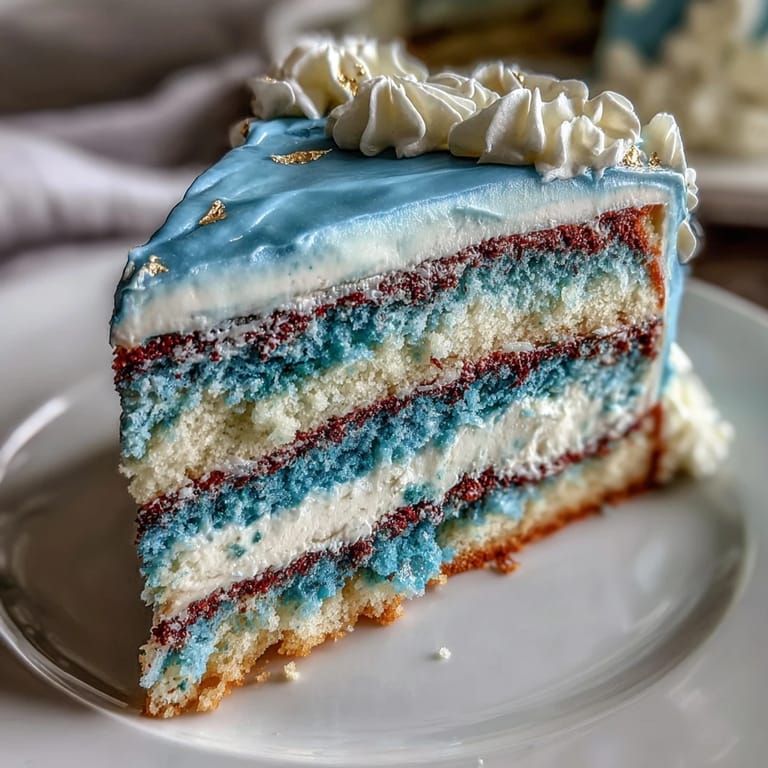
When my younger cousin graduated, he requested blue cake & nothing else. I spent an hour fiddling with the shades of blue, giggling as my nephew critiqued each one like a paint expert. The kitchen became a little noisy as everyone crowded around to watch the layering, and someone managed to poke a finger into the buttercream (not naming names, but he& still banned from the cake table). By the time the gold shimmer was brushed on, the house smelled like vanilla and anticipation. Everyone agreed: no store-bought cake could rival the fun we had baking it together.
Ingredients
- All-purpose flour: Use sifted flour to keep the crumb tender and avoid lumps; measuring carefully makes all the difference.
- Baking powder & baking soda: These work in tandem for a tall, airy cake—never skip checking their freshness.
- Salt: A pinch sharpens the cake& sweetness and adds balance, so don& leave it out.
- Unsalted butter: Soft butter blends smoothly into the batter and gives the cake its beautiful texture; patience while warming pays off.
- Granulated sugar: Properly creamed sugar ensures light, fluffy cake layers; don& rush this step.
- Large eggs: Room temperature eggs guarantee even mixing and a moist crumb; leaving them out for 30 minutes does wonders.
- Pure vanilla extract: The vanilla deepens flavor in both cake and buttercream, making every bite feel luxurious.
- Whole milk: It& key to moistness, and room temp milk prevents lumps—trust me, cold milk led to a disaster once.
- Blue gel food coloring: Gel colors hold their vibrancy without watering down batter; experimenting with shades is half the fun.
- Powdered sugar: Sifting avoids clumping in buttercream and keeps things silky smooth; I& learned this after a very lumpy incident.
- Milk or cream: A splash helps the buttercream reach that perfect spreadable texture; start slow so you don& overdo it.
- Edible gold leaf or gold dust: These bring the wow factor—just use tweezers or a brush for exact placement (those sheets can fly).
- Clear alcohol: Mixing gold dust with vodka or lemon extract paints streaks on smoothly and adds extra shine.
Tired of Takeout? 🥡
Get 10 meals you can make faster than delivery arrives. Seriously.
One email. No spam. Unsubscribe anytime.
Instructions
- Prep the pans:
- Grease your three cake pans and line them with parchment; sliding fingers along the edges is oddly satisfying.
- Mix dry ingredients:
- In a medium bowl, whisk together your flour, baking powder, baking soda, and salt—let the flour billow, no need to rush.
- Cream the butter & sugar:
- Beat butter and sugar until pale and fluffy, scraping the bowl down as the mixture grows creamy—listen for the change in sound.
- Add eggs & vanilla:
- Drop in eggs one at a time, mixing after each, then stir in vanilla; the batter starts smelling delicious at this stage.
- Combine wet & dry:
- Alternate adding flour mix and milk, starting and ending with flour; mix just until combined, avoiding over-beating.
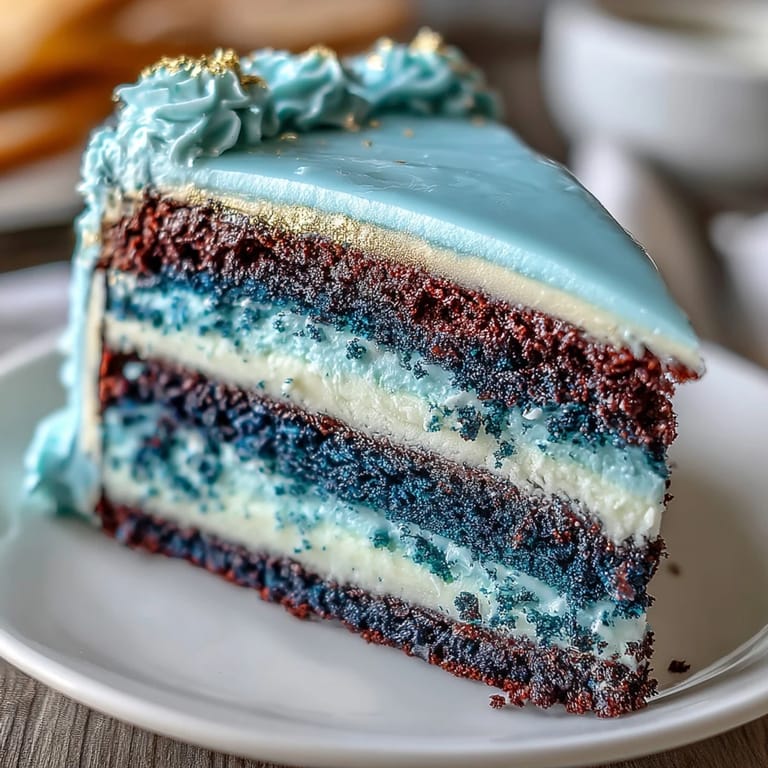
- Tint the batter:
- Split the batter into three bowls, tinting each for light, medium, and deep blue—watch the colors transform and adjust until you& happy.
- Bake the layers:
- Pour each color into a pan, smooth tops, and bake for 25–30 minutes; enjoy the rising scent but don& open the oven too early.
- Cool the cakes:
- Let cakes cool in pans for 10 minutes, then transfer to a wire rack; patience here prevents cracks.
- Make buttercream:
- Beat butter until creamy and add powdered sugar gradually—don& hurry or clouds of sugar will fill your kitchen.
- Color the buttercream:
- Reserve some plain for crumb coat, then mix dark blue into the rest; keep tasting until the shade and sweetness hit the mark.
- Assemble the layers:
- Level cakes if needed, then layer darkest to lightest with buttercream between—keep an eye on tilt and alignment.
- Apply crumb coat:
- Spread a thin layer of plain buttercream around the cake and chill for 20 minutes; this step keeps crumbs from sneaking into the final coat.
- Frost ombre style:
- Frost with dark blue buttercream, blending lighter shades up the sides if desired; smooth with a spatula for that professional look.
- Add gold accents:
- Press gold leaf or brush on gold dust streaks for elegant flair; don& fuss about perfection—the shimmer catches light beautifully.
- Chill & serve:
- Chill the finished cake until serving time; slicing through the ombre layers is a magic moment.
 Save
Save The night before my brother& graduation, we gathered around for a sneak preview slice. Our laughter echoed while the gold dust settled into the frosting, and even the adults took photos of the layers before diving in. It became more than dessert—suddenly the cake was the day& centerpiece and a trophy for everyone& hard work. That first bite tasted like celebration itself.
Mastering Color Gradients in Cake
Getting a perfect ombre takes patience—layering colors in batter and buttercream feels like mixing paint. If you want a deeper effect, try tweaking each bowl& color with just a drop more gel at a time. Matching the shade of each layer before baking avoids surprises when you cut. I& found that lining up colored bowls side by side helps compare and adjust easily.
Creating Impressive Gold Details
A gentle hand makes applying gold leaf or dust so much easier; those sheets can flutter and stick to anything. Using tweezers keeps your gold accents crisp, while mixing gold dust with alcohol lets you paint dazzling streaks on the cake. Test a tiny patch before decorating the whole cake—the shine multiplies when placed on darker buttercream.
Troubleshooting Common Cake Mishaps
Sometimes, cake layers sink or buttercream turns grainy. Double-checking ingredient temperatures fixes most problems; if your cakes lean, just trim the tops with a serrated knife and stack carefully. When you& not sure about the ombre effect, a few extra drops of blue food color can bring the magic back.
- If buttercream is too soft, chill it briefly—the texture smooths right out.
- Slice cake with a sharp, warm knife for neat, dramatic layers.
- Don& decorate while distracted; gold leaf sticks fast and can& be moved!
 Save
Save Even if gold flecks end up on your shirt, this cake always turns heads and sparks smiles. Celebrate big milestones with bold colors and sweet flavors—you won& regret going a little over the top.
Recipe FAQ
- → How do I achieve the ombre effect with blue layers?
Divide batter into bowls and tint each with varying shades of blue, from light to dark, before baking separately.
- → What creates the rich buttercream texture?
Creaming unsalted butter smoothly, then gradually adding powdered sugar and mixing until fluffy delivers a silky finish.
- → Can I substitute gold leaf with gold dust?
Yes, edible gold dust mixed with clear alcohol can be brushed onto the cake for luminous gold accents.
- → What are the best tools for layering and frosting?
Use a cake turntable, offset spatula, and parchment-lined pans to ensure smooth frosting and easy layering.
- → What allergens should I be aware of?
Wheat, eggs, dairy are present. Confirm gold decorations are edible and safe for your guests.
- → Is this cake suitable for vegetarians?
Yes, it contains no meat or gelatin, making it appropriate for vegetarian diets.